
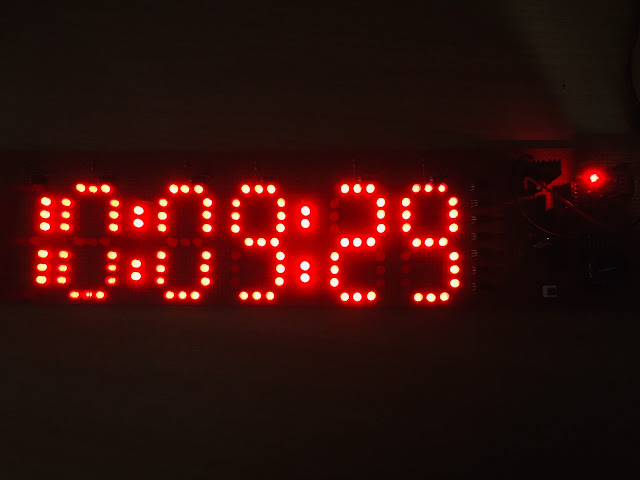
This is an LED clock with SD 323 RTC module. This module is able to give the time accurately and it is very easy to code without hard coding.
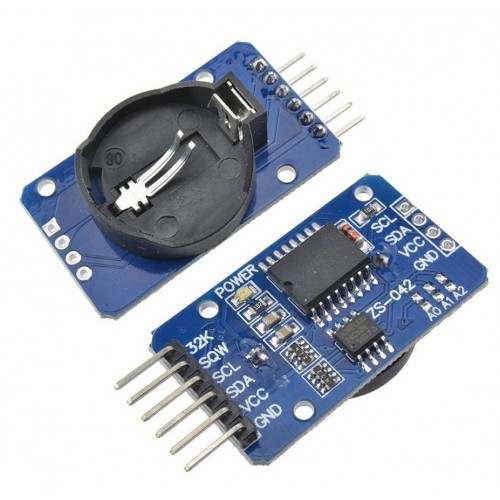 RTC Module
 Rotary Encoder
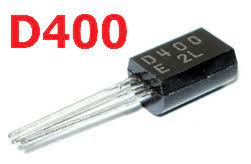 D400 transistor
I hope you have watched my previous project made to create arduino LED clock with setnfix. The wiring for SSDs are as same as that project.
www.setnfix.com/2020/02/arduino-led-rtc-clock-with-seconds-and.html
However, I have made some changes by doing some experiments. Specially I have used only NPN transistors instead of using both NPN and PNP transistors.
2. There is a Rotary encoder to set the time and change the time as well.
3.A switch is fixed to change the 12h mode to 24 hours mode.
Operation
Main part of this project is atmega 328 programming IC and it is connected RTC module DS 3231. The RTC module has a battery cell and it can be sored the current time. Therefore, even the device power is down, once the power came the correct time will be displayed.
Time display using DIY SSDs with LED bulbs. those are powered by NPN transistors (D400). In order to display the time multiplex method is used.
Adjustment
Just the programme is uploaded, the computer time will be displayed.
1. Press one time the rotary encoder to change the minutes : you can up and down the minutes by rotating the rotary encoder.
2. Press one more time the rotary encoder to change the Hours: you can up and down the hours by rotating the rotary encoder. after the 12 noon, it will show 13,14,15 etc up to 23 and the 24 will be displayed as0.
3.Press again to save the time. As press the 3rd time, the seconds will be "00" with saving the time.
24/12 hour mode
** You can change the mode from 24 hour to 12 hour by pressing the button switch.
List of Items
Atmega 328p : https://s.click.aliexpress.com/e/_Ar9cvT
DS3231 RTC module : https://s.click.aliexpress.com/e/_9HuQMt
D400/2n2222 transistors : https://s.click.aliexpress.com/e/_9jYHU9
Red LED bulbs : https://s.click.aliexpress.com/e/_A2rVtR
Rotary Encoder : https://s.click.aliexpress.com/e/_AaU7Kh
Circuit Diagram

The code is as follows;
  /*
This is programmed by BMIAK Basnayaka for SETNFIX youtube channel.
www.setnfix.com
youtube.com/setnfix
Date June 6th 2022

***************************************************************************
Operation
Main part of this project is atmega 328 programming IC and it is connected RTC module DS 3231. The RTC module has a battery cell and it can be sored the current time. Therefore, even the device power is down, once the power came the correct time will be displayed.
Time display using DIY SSDs with LED bulbs. those are powered by NPN transistors (D400). In order to display the time multiplex method is used.

Adjustment
Just the programme is uploaded, the computer time will be displayed.

1. Press one time the rotary encoder to change the minutes : you can up and down the minutes by rotating the rotary encoder.
2. Press one more time the rotary encoder to change the Hours: you can up and down the hours by rotating the rotary encoder. after the 12 noon, it will show 13,14,15 etc up to 23 and the 24 will be displayed as0.
3.Press again to save the time. As press the 3rd time, the seconds will be "00" with saving the time.
24/12 hour mode
** You can change the mode from 24 hour to 12 hour by pressing the button switch.

List of Items

Atmega 328p :  https://s.click.aliexpress.com/e/_Ar9cvT
DS3231 RTC module : https://s.click.aliexpress.com/e/_9HuQMt
D400/2n2222 transistors : https://s.click.aliexpress.com/e/_9jYHU9
Red LED bulbs : https://s.click.aliexpress.com/e/_A2rVtR
Rotary Encoder : https://s.click.aliexpress.com/e/_AaU7Kh

The circuit diagram and the codes cab be seen in the youtube posts.


*/
// modified connexion by niq_ro from http://nicuflorica.blogspot.com
// dataseet: http://www.tme.eu/ro/Document/dfc2efde2e22005fd28615e298ea2655/KW4-563XSA.pdf

#include
#include "RTClib.h"
RTC_DS3231 rtc;
int sH;
int sM;
byte minutes1 = 0;
byte hours1 = 0;
byte minutes = 0;
byte hours = 0;
int OldScnd=0;

int digit1 = 3; // 15
int digit2 = 5;//12
int digit3 = 6; //11
int digit4 = 9;//5
int digit5 = 10; //3
int digit6 = 11; //2

int segA = 0; //Display pin 18
int segB = 1; //Display pin 17
int segC = 2; //Display pin 16
int segD = 4; //Display pin 14
int segE = 7; //Display pin 13
int segF = 8; //Display pin 6
int segG = 12; //Display pin 4


int hPin = A0;
int segDP = A1; // AM/PM LED

int encoder0PinA = A2;
int encoder0PinB = A3;
int encoder0Pos = 0;
int encoder0PinALast = LOW;
int n = LOW;
const int buttonPin = 13;
// Variables will change:
int ledState = HIGH;         // the current state of the output pin
int buttonState;             // the current reading from the input pin
int lastButtonState = LOW;   // the previous reading from the input pin
int reading = 0;
int dUP = 0;

// the following variables are unsigned longs because the time, measured in
// milliseconds, will quickly become a bigger number than can be stored in an int.
unsigned long lastDebounceTime = 0;  // the last time the output pin was toggled
unsigned long debounceDelay = 50;    // the debounce time; increase if the output flickers


int clickPin = 0;
int clickNow = 0;

/*
  // Date and time functions using a DS1307 RTC connected via I2C and Wire lib
  // original sketck from http://learn.adafruit.com/ds1307-real-time-clock-breakout-board-kit/
  // add part with SQW=1Hz from http://tronixstuff.wordpress.com/2010/10/20/tutorial-arduino-and-the-i2c-bus/
  // add part with manual adjust http://www.bristolwatch.com/arduino/arduino_ds1307.htm

*/

// use for hexa in zecimal conversion
int zh, uh, ore;
int zm, um, miniti;

void setup() {


  {
    //Serial.begin(9600);
    delay(3000); // wait for console opening

    if (! rtc.begin()) {
      Serial.println("Couldn't find RTC");
      while (1);
    }

    if (rtc.lostPower()) {
      Serial.println("RTC lost power, lets set the time!");

      // Comment out below lines once you set the date & time.
      // Following line sets the RTC to the date & time this sketch was compiled
      rtc.adjust(DateTime(F(__DATE__), F(__TIME__)));

      // Following line sets the RTC with an explicit date & time
      // for example to set January 27 2017 at 12:56 you would call:
      //rtc.adjust(DateTime(2017, 1, 27, 12, 56, 0));
    }
  }

  pinMode(segA, OUTPUT);
  pinMode(segB, OUTPUT);
  pinMode(segC, OUTPUT);
  pinMode(segD, OUTPUT);
  pinMode(segE, OUTPUT);
  pinMode(segF, OUTPUT);
  pinMode(segG, OUTPUT);
  pinMode(segDP, OUTPUT);
  pinMode(hPin,INPUT_PULLUP);

  pinMode(digit1, OUTPUT);
  pinMode(digit2, OUTPUT);
  pinMode(digit3, OUTPUT);
  pinMode(digit4, OUTPUT);
  pinMode(digit5, OUTPUT);
  pinMode(digit6, OUTPUT);
  pinMode(buttonPin, INPUT_PULLUP);
  pinMode (encoder0PinA, INPUT);
  pinMode (encoder0PinB, INPUT);

}


void loop() {

  //DateTime now = Myset.now();
  DateTime now = rtc.now();

  reading = digitalRead(buttonPin);

  if (reading != lastButtonState) {
    // reset the debouncing timer
    lastDebounceTime = millis();
  }

  if ((millis() - lastDebounceTime) > debounceDelay) {
    // whatever the reading is at, it's been there for longer than the debounce
    // delay, so take it as the actual current state:

    // if the button state has changed:
    if (reading != buttonState) {
      buttonState = reading;

      // only toggle the LED if the new button state is HIGH
      if (buttonState == LOW) {
        clickPin = clickPin + 1;
        delay(500);
      }
    }
  }

  //if (clickPin > 3) {clickPin =0;}
  // save the reading. Next time through the loop, it'll be the lastButtonState:
  lastButtonState = reading;

  if (clickPin==0){//*********************************************************

  DateTime future (now + TimeSpan(0, 0, 0, 0));

  long timp = future.hour() * 10000UL + future.minute() * 100 + future.second();
  Serial.println(" timp : ");
  Serial.print(timp);
sM = future.minute(); // load current minute for adjustment
sH = future.hour(); // load current hours for adjustment

//*************************************************************************************
//24 details code
//*************************************************************************************

int hData = digitalRead(hPin);
if (hData ==0){

  if (timp > 130000){
    timp = timp - 120000;
  }

}

//*************************************************************************************
//24 details code END
//*************************************************************************************

//----------------------------------------------------------------------------

  for (int i = 10 ; i > 0  ; i--) {
    if (timp >= 100000) displayNumber01(timp);
    else displayNumber02(timp);
  }

  }//*********************************************************


Serial.println(clickPin);

//*************************************************************************************
// Code for Segment LEDS
//*************************************************************************************
int Scnd = now.second();

if (Scnd != OldScnd){
          if (Scnd % 2==0){
            digitalWrite(segDP,HIGH);} else{digitalWrite(segDP,LOW);}
          }

 OldScnd = Scnd;
 //*************************************************************************************
 // Code for Segment LEDS END
 //*************************************************************************************

//*************************************************************************************
if (clickPin > 0){ // Editing Mode Started---------------------------------------------
//*************************************************************************************

n = digitalRead(encoder0PinA);
   if ((encoder0PinALast == LOW) && (n == HIGH)) {
     if (digitalRead(encoder0PinB) == LOW) {

            if (clickPin==1){sM = sM-1;delay(5); if (sM < 0)sM =59;delay(5);}
            if (clickPin==2){sH=sH-1; delay(5);if (sH < 0)sH =23;delay(5);}
            delay(100);

     } else {

            if (clickPin==1){sM = sM +1;delay(5); if (sM > 59)sM =0; delay(5);}
            if (clickPin==2){sH=sH+1;delay(5); if (sH > 23)sH =0;delay(5);}
           delay(100);
     }
     }
encoder0PinALast = n;
//DateTime now = rtc.now();
//Serial.println("H : ");
//Serial.println(future.hour(),DEC);

long timp = sH * 10000UL + sM *100;

  for (int i = 20 ; i > 0  ; i--) {
    if (timp >= 100000) displayNumber01(timp);
    else displayNumber02(timp);
  }

if (clickPin > 2){
   //DateTime future (now + TimeSpan(0, sH, sM, 0));
rtc.adjust(DateTime(1985, 4, 7, sH,sM, 0));
//rtc.adjust(DateTime(2017, 1, 27, 12, 56, 0));
delay(500);
sH=0;
sM=0;


clickPin=0; // reset the pin after saving time

}

//*************************************************************************************
  }// Editing Mode END````````````````````````````````````````````````````````````````
//*************************************************************************************


}//===========================VOID LOOP END==============================================


void displayNumber01(long toDisplay) {
#define DISPLAY_BRIGHTNESS  25

#define DIGIT_ON  HIGH
#define DIGIT_OFF  LOW

  for (int digit = 6 ; digit > 0 ; digit--) {

    //Turn on a digit for a short amount of time
    switch (digit) {
      case 1:
        digitalWrite(digit1, DIGIT_ON);
        //digitalWrite(segDP, HIGH);
        break;
      case 2:
        digitalWrite(digit2, DIGIT_ON);
        //digitalWrite(segDP, LOW);
        break;
      case 3:
        digitalWrite(digit3, DIGIT_ON);
        //digitalWrite(segDP, HIGH);
        break;
      case 4:
        digitalWrite(digit4, DIGIT_ON);
        //digitalWrite(segDP, HIGH);
        break;
      case 5:
        digitalWrite(digit5, DIGIT_ON);
        //digitalWrite(segDP, HIGH);
        break;
      case 6:
        digitalWrite(digit6, DIGIT_ON);
        //digitalWrite(segDP, HIGH);
        break;

    }
    lightNumber(toDisplay % 10);
    toDisplay /= 10;
    delayMicroseconds(DISPLAY_BRIGHTNESS);

    //Turn off all segments
    lightNumber(10);

    //Turn off all digits
    digitalWrite(digit1, DIGIT_OFF);
    digitalWrite(digit2, DIGIT_OFF);
    digitalWrite(digit3, DIGIT_OFF);
    digitalWrite(digit4, DIGIT_OFF);
    digitalWrite(digit5, DIGIT_OFF);
    digitalWrite(digit6, DIGIT_OFF);
  }
}

void displayNumber02(long toDisplay) {
#define DISPLAY_BRIGHTNESS  25

#define DIGIT_ON  HIGH
#define DIGIT_OFF  LOW

  for (int digit = 6 ; digit > 0 ; digit--) {

    //Turn on a digit for a short amount of time
    switch (digit) {
      case 1:
        lightNumber(10);
        //digitalWrite(segDP, HIGH);
        break;
      case 2:
        digitalWrite(digit2, DIGIT_ON);
        //digitalWrite(segDP, LOW);
        break;
      case 3:
        digitalWrite(digit3, DIGIT_ON);
        //digitalWrite(segDP, HIGH);
        break;
      case 4:
        digitalWrite(digit4, DIGIT_ON);
        //digitalWrite(segDP, HIGH);
        break;
      case 5:
        digitalWrite(digit5, DIGIT_ON);
        //digitalWrite(segDP, HIGH);
        break;
      case 6:
        digitalWrite(digit6, DIGIT_ON);
        //digitalWrite(segDP, HIGH);
        break;
    }
    lightNumber(toDisplay % 10);
    toDisplay /= 10;
    delayMicroseconds(DISPLAY_BRIGHTNESS);

    //Turn off all segments
    lightNumber(10);

    //Turn off all digits
    digitalWrite(digit1, DIGIT_OFF);
    digitalWrite(digit2, DIGIT_OFF);
    digitalWrite(digit3, DIGIT_OFF);
    digitalWrite(digit4, DIGIT_OFF);
    digitalWrite(digit5, DIGIT_OFF);
    digitalWrite(digit6, DIGIT_OFF);
  }
}

void displayNumber03(long toDisplay) {
#define DISPLAY_BRIGHTNESS  25

#define DIGIT_ON  HIGH
#define DIGIT_OFF  LOW

  for (int digit = 6 ; digit > 0 ; digit--) {

    //Turn on a digit for a short amount of time
    switch (digit) {
      case 1:
        digitalWrite(digit1, DIGIT_ON);
        //digitalWrite(segDP, HIGH);
        break;
      case 2:
        digitalWrite(digit2, DIGIT_ON);
        //digitalWrite(segDP, HIGH);
        break;
      case 3:
        digitalWrite(digit3, DIGIT_ON);
        //digitalWrite(segDP, HIGH);
        break;
      case 4:
        digitalWrite(digit4, DIGIT_ON);
        //digitalWrite(segDP, HIGH);
        break;
      case 5:
        digitalWrite(digit5, DIGIT_ON);
        //digitalWrite(segDP, HIGH);
        break;
      case 6:
        digitalWrite(digit6, DIGIT_ON);
        //digitalWrite(segDP, HIGH);
        break;
    }
    lightNumber(toDisplay % 10);
    toDisplay /= 10;
    delayMicroseconds(DISPLAY_BRIGHTNESS);

    //Turn off all segments
    lightNumber(10);

    //Turn off all digits
    digitalWrite(digit1, DIGIT_OFF);
    digitalWrite(digit2, DIGIT_OFF);
    digitalWrite(digit3, DIGIT_OFF);
    digitalWrite(digit4, DIGIT_OFF);
    digitalWrite(digit5, DIGIT_OFF);
    digitalWrite(digit6, DIGIT_OFF);
  }
}

void displayNumber04(long toDisplay) {
#define DISPLAY_BRIGHTNESS  25

#define DIGIT_ON  HIGH
#define DIGIT_OFF  LOW

  for (int digit = 4 ; digit > 0 ; digit--) {

    //Turn on a digit for a short amount of time
    switch (digit) {
      case 1:
        lightNumber(10);
        //digitalWrite(segDP, HIGH);
        break;
      case 2:
        digitalWrite(digit2, DIGIT_ON);
        //digitalWrite(segDP, HIGH);
        break;
      case 3:
        digitalWrite(digit3, DIGIT_ON);
        //digitalWrite(segDP, HIGH);
        break;
      case 4:
        digitalWrite(digit4, DIGIT_ON);
        //digitalWrite(segDP, HIGH);
        break;
      case 5:
        digitalWrite(digit5, DIGIT_ON);
        //digitalWrite(segDP, HIGH);
        break;
      case 6:
        digitalWrite(digit6, DIGIT_ON);
        //digitalWrite(segDP, HIGH);
        break;
    }
    lightNumber(toDisplay % 10);
    toDisplay /= 10;
    delayMicroseconds(DISPLAY_BRIGHTNESS);

    //Turn off all segments
    lightNumber(10);

    //Turn off all digits
    digitalWrite(digit1, DIGIT_OFF);
    digitalWrite(digit2, DIGIT_OFF);
    digitalWrite(digit3, DIGIT_OFF);
    digitalWrite(digit4, DIGIT_OFF);
    digitalWrite(digit5, DIGIT_OFF);
    digitalWrite(digit6, DIGIT_OFF);
  }
}

void displayNumber05(long toDisplay) {
#define DISPLAY_BRIGHTNESS  25

#define DIGIT_ON  HIGH
#define DIGIT_OFF  LOW

  for (int digit = 6 ; digit > 0 ; digit--) {

    //Turn on a digit for a short amount of time
    switch (digit) {
      case 1:
        digitalWrite(digit1, DIGIT_ON);
        //digitalWrite(segDP, HIGH);
        break;
      case 2:
        digitalWrite(digit2, DIGIT_ON);
        //digitalWrite(segDP, HIGH);
        break;
      case 3:
        digitalWrite(digit3, DIGIT_ON);
        //digitalWrite(segDP, HIGH);
        break;
      case 4:
        digitalWrite(digit4, DIGIT_ON);
        //digitalWrite(segDP, HIGH);
        break;
      case 5:
        digitalWrite(digit5, DIGIT_ON);
        //digitalWrite(segDP, HIGH);
        break;
      case 6:
        digitalWrite(digit6, DIGIT_ON);
        //digitalWrite(segDP, HIGH);
        break;
    }
    lightNumber(toDisplay % 10);
    toDisplay /= 10;
    delayMicroseconds(DISPLAY_BRIGHTNESS);

    //Turn off all segments
    lightNumber(10);

    //Turn off all digits
    digitalWrite(digit1, DIGIT_OFF);
    digitalWrite(digit2, DIGIT_OFF);
    digitalWrite(digit3, DIGIT_OFF);
    digitalWrite(digit4, DIGIT_OFF);
    digitalWrite(digit5, DIGIT_OFF);
    digitalWrite(digit6, DIGIT_OFF);
  }
}

void displayNumber06(long toDisplay) {
#define DISPLAY_BRIGHTNESS  25

#define DIGIT_ON  HIGH
#define DIGIT_OFF  LOW

  for (int digit = 6 ; digit > 0 ; digit--) {

    //Turn on a digit for a short amount of time
    switch (digit) {
      case 1:
        digitalWrite(digit1, DIGIT_ON);
       // //digitalWrite(segDP, HIGH);
        break;
      case 2:
        digitalWrite(digit2, DIGIT_ON);
        ////digitalWrite(segDP, HIGH);
        break;
      case 3:
        digitalWrite(digit3, DIGIT_ON);
        ////digitalWrite(segDP, HIGH);
        break;
      case 4:
        digitalWrite(digit4, DIGIT_ON);
        ////digitalWrite(segDP, HIGH);
        break;
      case 5:
        digitalWrite(digit5, DIGIT_ON);
        ////digitalWrite(segDP, HIGH);
        break;
      case 6:
        digitalWrite(digit6, DIGIT_ON);
        ////digitalWrite(segDP, HIGH);
        break;
    }
    lightNumber(toDisplay % 10);
    toDisplay /= 10;
    delayMicroseconds(DISPLAY_BRIGHTNESS);

    //Turn off all segments
    lightNumber(10);

    //Turn off all digits
    digitalWrite(digit1, DIGIT_OFF);
    digitalWrite(digit2, DIGIT_OFF);
    digitalWrite(digit3, DIGIT_OFF);
    digitalWrite(digit4, DIGIT_OFF);
    digitalWrite(digit5, DIGIT_OFF);
    digitalWrite(digit6, DIGIT_OFF);
  }
}
//Given a number, turns on those segments
//If number == 10, then turn off number
void lightNumber(int numberToDisplay) {

#define SEGMENT_ON  HIGH
#define SEGMENT_OFF LOW

  switch (numberToDisplay) {

    case 0:
      digitalWrite(segA, SEGMENT_ON);
      digitalWrite(segB, SEGMENT_ON);
      digitalWrite(segC, SEGMENT_ON);
      digitalWrite(segD, SEGMENT_ON);
      digitalWrite(segE, SEGMENT_ON);
      digitalWrite(segF, SEGMENT_ON);
      digitalWrite(segG, SEGMENT_OFF);
      break;

    case 1:
      digitalWrite(segA, SEGMENT_OFF);
      digitalWrite(segB, SEGMENT_ON);
      digitalWrite(segC, SEGMENT_ON);
      digitalWrite(segD, SEGMENT_OFF);
      digitalWrite(segE, SEGMENT_OFF);
      digitalWrite(segF, SEGMENT_OFF);
      digitalWrite(segG, SEGMENT_OFF);
      break;

    case 2:
      digitalWrite(segA, SEGMENT_ON);
      digitalWrite(segB, SEGMENT_ON);
      digitalWrite(segC, SEGMENT_OFF);
      digitalWrite(segD, SEGMENT_ON);
      digitalWrite(segE, SEGMENT_ON);
      digitalWrite(segF, SEGMENT_OFF);
      digitalWrite(segG, SEGMENT_ON);
      break;

    case 3:
      digitalWrite(segA, SEGMENT_ON);
      digitalWrite(segB, SEGMENT_ON);
      digitalWrite(segC, SEGMENT_ON);
      digitalWrite(segD, SEGMENT_ON);
      digitalWrite(segE, SEGMENT_OFF);
      digitalWrite(segF, SEGMENT_OFF);
      digitalWrite(segG, SEGMENT_ON);
      break;

    case 4:
      digitalWrite(segA, SEGMENT_OFF);
      digitalWrite(segB, SEGMENT_ON);
      digitalWrite(segC, SEGMENT_ON);
      digitalWrite(segD, SEGMENT_OFF);
      digitalWrite(segE, SEGMENT_OFF);
      digitalWrite(segF, SEGMENT_ON);
      digitalWrite(segG, SEGMENT_ON);
      break;

    case 5:
      digitalWrite(segA, SEGMENT_ON);
      digitalWrite(segB, SEGMENT_OFF);
      digitalWrite(segC, SEGMENT_ON);
      digitalWrite(segD, SEGMENT_ON);
      digitalWrite(segE, SEGMENT_OFF);
      digitalWrite(segF, SEGMENT_ON);
      digitalWrite(segG, SEGMENT_ON);
      break;

    case 6:
      digitalWrite(segA, SEGMENT_ON);
      digitalWrite(segB, SEGMENT_OFF);
      digitalWrite(segC, SEGMENT_ON);
      digitalWrite(segD, SEGMENT_ON);
      digitalWrite(segE, SEGMENT_ON);
      digitalWrite(segF, SEGMENT_ON);
      digitalWrite(segG, SEGMENT_ON);
      break;

    case 7:
      digitalWrite(segA, SEGMENT_ON);
      digitalWrite(segB, SEGMENT_ON);
      digitalWrite(segC, SEGMENT_ON);
      digitalWrite(segD, SEGMENT_OFF);
      digitalWrite(segE, SEGMENT_OFF);
      digitalWrite(segF, SEGMENT_OFF);
      digitalWrite(segG, SEGMENT_OFF);
      break;

    case 8:
      digitalWrite(segA, SEGMENT_ON);
      digitalWrite(segB, SEGMENT_ON);
      digitalWrite(segC, SEGMENT_ON);
      digitalWrite(segD, SEGMENT_ON);
      digitalWrite(segE, SEGMENT_ON);
      digitalWrite(segF, SEGMENT_ON);
      digitalWrite(segG, SEGMENT_ON);
      break;

    case 9:
      digitalWrite(segA, SEGMENT_ON);
      digitalWrite(segB, SEGMENT_ON);
      digitalWrite(segC, SEGMENT_ON);
      digitalWrite(segD, SEGMENT_ON);
      digitalWrite(segE, SEGMENT_OFF);
      digitalWrite(segF, SEGMENT_ON);
      digitalWrite(segG, SEGMENT_ON);
      break;

    // all segment are ON
    case 10:
      digitalWrite(segA, SEGMENT_OFF);
      digitalWrite(segB, SEGMENT_OFF);
      digitalWrite(segC, SEGMENT_OFF);
      digitalWrite(segD, SEGMENT_OFF);
      digitalWrite(segE, SEGMENT_OFF);
      digitalWrite(segF, SEGMENT_OFF);
      digitalWrite(segG, SEGMENT_OFF);
      break;

  }

} // ending the code
The circuit diagram can be seen in the youtube posts as well.Download the Code : bit.ly/3HCpwWt


 Clock with Seconds")

How much memory will take this program . Can I use ATMEGA 8 ?
ReplyDelete